ShopDreamUp AI ArtDreamUp
Deviation Actions
~ Special Supporter ~
Your support would mean a lot to me :)
Here you will find your picture, illustrations and much more, everything can be downloaded freely.
Support my work by contributing to my tip jar every month.
$1/month


Suggested Deviants


Suggested Collections


You Might Like…


Featured in Groups


Description
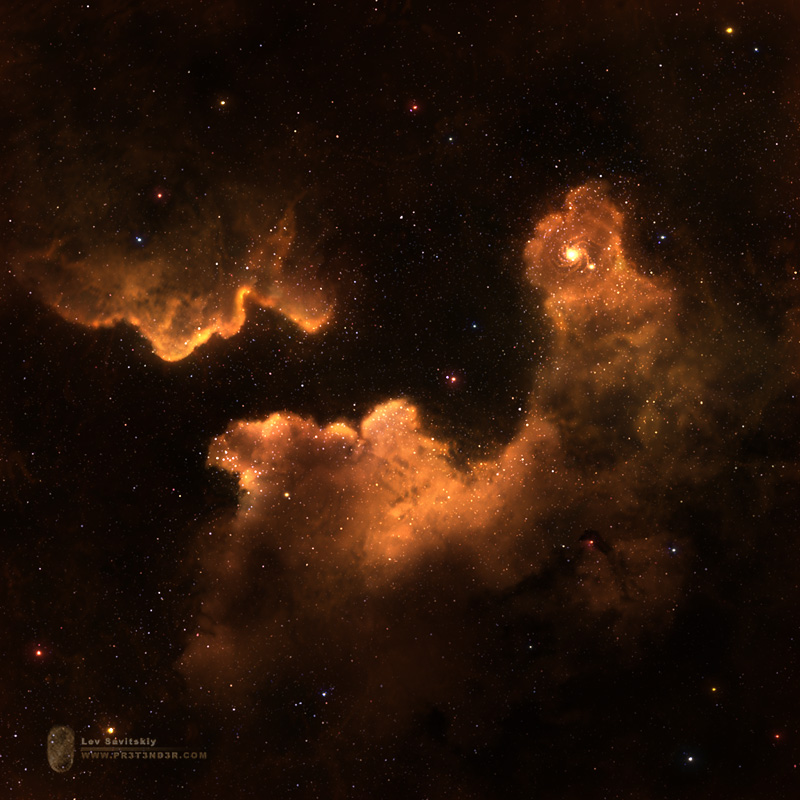
This is not really a tutorial but more like a walkthrough. Here I will go briefly through all of stages of making this neb.
The reason why I think it can be beneficial is because it explains an easy way of making nebs even for those who cannot draw them with mouse/tablet")
The time needed strongly depends on the amount of details you want to add to the neb. Sometimes, you really don't have to go too detailed.
Anyway, as a super sweet bonus to this you will be able to download a full-res PSD of the neb to see all the layers and settings I've used. I guess I'm too kind here but what the hell!
Also it would save me some time explaining things (Wink)")
Sorry for external links (Smile)") You can go to this link directly and just browse all images here or read and see each image separately. The link for all pictures
You can go to this link directly and just browse all images here or read and see each image separately. The link for all pictures
(также для русскоговорящих ссылка на демиарт, где я объясняю то же на русском )
[link]
Ok, so here goes:
Step 1:
I started with a simple starfield. You can see that some areas are deleted. I've done this on the final stages to add volume to the neb.
[link]
Step 2:
Here, just as an example, I've used the texture of Venus. Basicly, you can use any interesting texture with uneven disctribution of light/shadow parts.
I've made couple of copies of this layer. First was blurred and set to linear dodge (~10%) as a base for the second layer which was set to color dodge and with increased contrast. The third one was basicly a layer to add glow, you can see that in the PSD.
[link]
Step 3:
On this stage I've started adding photos of clouds. The were manipped so that you get only cloud shapes on black background (the technique is described pretty well here:
[link] ). They were then set to color dodge, low opacity.
We need them to add shape to our future neb. Also on this stage it will be clear how the neb will look like. The position depends on the texture and clouds you're using and is totally up to you.
[link]
Step 4:
Here I've used chalk brush with shape dynamics and scaterring enabled.
[link]
With small bright brush I've painted over the edges and with a big brush in dark areas to add contrast.
[link]
Step 5:
This was the longest stage. Here I was adding glow in different areas with lens flare. Basicly, I just created a black circle and filled it with a lens flare, then duplicate, set to color dodge and you just go all over Remember to bring down the opacity.
[link]
After I was finished, I duplicated them all and set to even lower opacity to make the transition softer. And also painted a small galaxy
[link]
Step 6:
Here I've added dark clouds to bring more details. I've used cirrus clouds and edited them the same way as before, just now they were inverted (ctrl+I) and set to multiply.
[link]
Step 7:
On this stage I just added bigger stars all over and worked on the colors more.
That's it
Use, abuse, do whatever you want, just remember, if you want to thank me - I prefer gifts and money
The reason why I think it can be beneficial is because it explains an easy way of making nebs even for those who cannot draw them with mouse/tablet
The time needed strongly depends on the amount of details you want to add to the neb. Sometimes, you really don't have to go too detailed.
Anyway, as a super sweet bonus to this you will be able to download a full-res PSD of the neb to see all the layers and settings I've used. I guess I'm too kind here but what the hell!
Also it would save me some time explaining things
Sorry for external links
(также для русскоговорящих ссылка на демиарт, где я объясняю то же на русском
[link]
Ok, so here goes:
Step 1:
I started with a simple starfield. You can see that some areas are deleted. I've done this on the final stages to add volume to the neb.
[link]
![[link]](https://www.deviantart.com/users/outgoing?http://demiart.ru/forum/uploads3/post-29530-1239408081.jpg)
Step 2:
Here, just as an example, I've used the texture of Venus. Basicly, you can use any interesting texture with uneven disctribution of light/shadow parts.
I've made couple of copies of this layer. First was blurred and set to linear dodge (~10%) as a base for the second layer which was set to color dodge and with increased contrast. The third one was basicly a layer to add glow, you can see that in the PSD.
[link]
![[link]](https://www.deviantart.com/users/outgoing?http://demiart.ru/forum/uploads3/post-29530-1239408362.jpg)
Step 3:
On this stage I've started adding photos of clouds. The were manipped so that you get only cloud shapes on black background (the technique is described pretty well here:
[link] ). They were then set to color dodge, low opacity.
We need them to add shape to our future neb. Also on this stage it will be clear how the neb will look like. The position depends on the texture and clouds you're using and is totally up to you.
[link]
![[link]](https://www.deviantart.com/users/outgoing?http://demiart.ru/forum/uploads3/post-29530-1239408601.jpg)
Step 4:
Here I've used chalk brush with shape dynamics and scaterring enabled.
[link]
![[link]](https://www.deviantart.com/users/outgoing?http://demiart.ru/forum/uploads3/post-29530-1239409115.jpg)
With small bright brush I've painted over the edges and with a big brush in dark areas to add contrast.
[link]
![[link]](https://www.deviantart.com/users/outgoing?http://demiart.ru/forum/uploads3/post-29530-1239409117.jpg)
Step 5:
This was the longest stage. Here I was adding glow in different areas with lens flare. Basicly, I just created a black circle and filled it with a lens flare, then duplicate, set to color dodge and you just go all over
[link]
![[link]](https://www.deviantart.com/users/outgoing?http://demiart.ru/forum/uploads3/post-29530-1239409441.jpg)
After I was finished, I duplicated them all and set to even lower opacity to make the transition softer. And also painted a small galaxy
[link]
![[link]](https://www.deviantart.com/users/outgoing?http://demiart.ru/forum/uploads3/post-29530-1239409443.jpg)
Step 6:
Here I've added dark clouds to bring more details. I've used cirrus clouds and edited them the same way as before, just now they were inverted (ctrl+I) and set to multiply.
[link]
![[link]](https://www.deviantart.com/users/outgoing?http://demiart.ru/forum/uploads3/post-29530-1239409647.jpg)
Step 7:
On this stage I just added bigger stars all over and worked on the colors more.
That's it
Use, abuse, do whatever you want, just remember, if you want to thank me - I prefer gifts and money
Image size
1000x1000px 22.6 MB
© 2009 - 2024 Pr3t3nd3r
Comments27
Join the community to add your comment. Already a deviant? Log In
i dont know if i already commented but this is amazing and a fresh technique
horsho spasibo
horsho spasibo